A couple of months ago I signed up for Sanae and Ute's Secret Valentine Exchange, because I love sewing little gifts for people AND I love getting parcels in the mail. Win, win! The recipient of my Valentine's gift, Kelley, emailed me last week to say she had received her parcel, so I can now safely show what I made for the exchange (my own gift hasn't arrived yet, but that's OK - mail is sometimes very slow around here).
For the exchange I was given some information about Kelley: she likes blue, purple, green and grey, is fond of cute animal prints (among other things) and enjoys gardening. When posting overseas I like to make things that can fit in a large envelope, because our postal charges are ridiculous once packages are deemed thick enough to be 'parcels'. So with all these things in mind, I decided to try out the Straight Stitch Society's 'forget me not' jewellery pouch pattern, which is a round pouch with several internal pockets for small jewellery items and a central space perfect for bracelets and larger items. I used a lavender-coloured linen for the main fabric and some chambray-coloured linen and spotted quilting cotton for the interior. I love the way this worked out and this pattern is definitely going to be used again and again.
I also made a little heart-shaped zipper pouch in Cloud 9 canvas (I've previously made one for my daughter as a Valentine's gift and it's been a great little schoolbag coin purse) and one of my 'Nude Food' sandwich wrappers (tutorial here) in a doggy print. As Kelley likes gardening I added an envelope of parsley seeds from my back yard, because even if she already has parsley growing I always think it's nice to plant seeds from somewhere far away. I wrapped everything up in pieces of Chinese and Balinese calendar (one of them dates from nearly two decades ago, evidence of my serious paper-hoarding tendencies) and sent them off to California.
Kelley sent me a lovely email thanking me for the presents, but really the pleasure was all mine. I so enjoyed putting this little package together that I can hardly wait for the next SVE!
Monday, 16 February 2015
Sunday, 8 February 2015
Sunsmart bathers
In the two evenings before leaving for our holiday I managed to sew (at breakneck speed in between packing, cleaning and child-wrangling) a rash vest and bather pants set for R. She loves her spotty bathers I made earlier this summer but really needed something a bit more sunsmart, and as this Chloroban fabric is UV-resistant it should do the job very well. For the top I used a pattern from an old Ottobre I found in an op-shop recently (a real bargain at just one dollar). This was my first time using an Ottobre pattern (and my first time sewing raglan sleeves), and although the instructions were minimal, the construction was very simple. The pattern was for a boy's top with ribbed neck and cuffs but I lengthened the sleeves a little and hemmed them instead, also drafting a fabric neckband in lieu of ribbing. The size was total guesswork as I sewed it at night when R was asleep, but when I tried it on her in the morning I was pleasantly surprised to find that it was perfect. The pants - which I adapted from the Cosi swimsuit pattern - are quite a tight fit and I doubt they'll last til next summer. But never mind, I have enough fabric left to make a larger version when required.

We were lucky enough to have some beach weather today and the bathers had their first outing. I feel very satisfied with this last item for Kids Clothes Week. Simple, practical, cute - and for probably the first time ever, I didn't have to unpick a single seam!
Friday, 6 February 2015
KCW: A trio of t-shirts
The theme for this season's Kids Clothes Week is 'upcycled'. I'm not a huge upcycler, mainly because I wear my clothes til they are literally falling apart, and by then there's not much left to work with. And while I have my eye on a few of my husband's shirts, he's not prepared to part with a single one (despite having nearly 100 of them, which I think is ridiculous). Nevertheless, KCW provided the impetus for me to clear out a pile of old torn, stained and too-small clothes that I'd kept in hopes of repurposing them in some way, and in doing so I found a couple of upcyclable tops.
Daydreaming about what to make, and having decided that this will be the year I sew some boring things like plain leggings and t-shirts, I sketched some ideas for t-shirts for R. I was aiming for 4 and managed to make 3 before preparations for our family holiday took over and I had to call it a day.
The grey t-shirt turned out the best. I used one of K's t-shirts and retained the existing neckline and shoulder seams, but cut out all the rest using one of R's tops as a guide. I also used the sleeve hems to be the hems of the flutter sleeves, which worked out great.
The bluey-grey t-shirt is not upcycled. It's made from some stretchy cotton jersey, with the flutter sleeves made from South African Three Cats fabric. I got lazy and didn't use my double needle for the hem; consequently it doesn't look great. Oh well...
T-shirt number three is made from an old top of mine and I have no idea how it looks on R because I haven't yet tried it on her and she was too hot and bothered after school to model anything (and I was too hot and bothered to take decent photos). I'm thinking the sleeves look kind of ridiculous - I didn't have much fabric to work with as I had to avoid a paint stain on the original top - but if they look silly on, I'll just downcycle it into a rag and call it a learning experience.
In my enthusiasm for upcyling I made a little stamp with a recycling symbol on it, so my upcycled garments now have their own special label!
The grey t-shirt turned out the best. I used one of K's t-shirts and retained the existing neckline and shoulder seams, but cut out all the rest using one of R's tops as a guide. I also used the sleeve hems to be the hems of the flutter sleeves, which worked out great.
The bluey-grey t-shirt is not upcycled. It's made from some stretchy cotton jersey, with the flutter sleeves made from South African Three Cats fabric. I got lazy and didn't use my double needle for the hem; consequently it doesn't look great. Oh well...
T-shirt number three is made from an old top of mine and I have no idea how it looks on R because I haven't yet tried it on her and she was too hot and bothered after school to model anything (and I was too hot and bothered to take decent photos). I'm thinking the sleeves look kind of ridiculous - I didn't have much fabric to work with as I had to avoid a paint stain on the original top - but if they look silly on, I'll just downcycle it into a rag and call it a learning experience.
In my enthusiasm for upcyling I made a little stamp with a recycling symbol on it, so my upcycled garments now have their own special label!
Friday, 23 January 2015
A mermaid costume and a homemade gift
I love sewing and have certain standards for the things I make. I'll unpick and re-sew (often several times) until I get things perfect, and visit shop after shop to find the exact right cord or ribbon. When it comes to kids' costumes, however, the opposite is true. Almost every costume I've ever made has been a slapdash, lazy effort replete with dodgy gathering, shonky hemlines and a few safety pins making up for less-than-perfect fitting. Because the costumes may only be worn once, and because I'm just not that into making them, there's only so much time and effort I'm prepared to put in.
So I wasn't planning to blog this outfit, whipped up the night before R's friend's party for which mermaid attire was required. But when she tried it on (ten minutes before the party was due to start, with me holding the safety pins in preparation) it not only fitted her perfectly, but she looked so gorgeous I pulled out the camera and started snapping away.
The outfit is self-drafted, if cutting and sewing by eye can even be called drafting. The skirt is just a stretchy tube with some ruffles at the end, and the top is bandeau-style (another tube, really) with halter-neck straps. The fabric was Spotlight's cheapest sparkly stuff and has a kind of psychedelic blotchy yellow-and-green effect going on, but it's perfect for mermaid clothing. I used stretch stitch throughout, but the fabric is actually not all that stretchy so getting into the car was a bit of an ordeal for poor R. Fortunately the skirt/tail can be hiked up and worn as a short, pouffy skirt (which looked really cool - wish I'd taken a photo of it) so as to be able to play party games, dance and outrun other children during the treasure hunt.
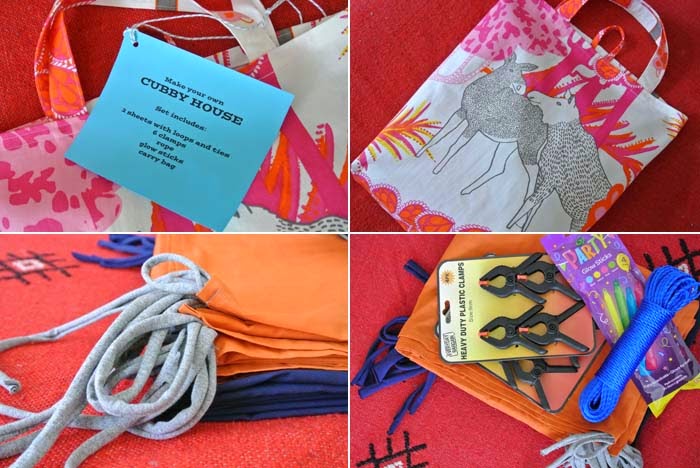
For the birthday girl I made a 'make your own cubby house' kit similar to the one I made for my nephew last year. My own kids adore building cubbies but are constantly frustrated by the difficulties of getting sheets and blankets to attach securely to chairs. The kit solves this problem with a bunch of clamps (SO much better than clothes pegs), some rope, and loops and ties on each corner of the sheets (I use strips of jersey and add loops/ties at the centre of each long edge too). A few glow sticks add mood lighting to the cubby house, or you can throw in a torch like I did last time. I packaged the whole lot up in a tote bag made from Ikea fabric - I love this fabric, and am really pleased I have some left so I can sew myself a bag too! Check out this tutorial for more details of cubby house (or 'fort') kits.
I suppose I should make my kids their own kit now, but last time they built a cubby - just a few days ago - a cat pooed in it. Nice. So I'm not that into cubbies at the moment, but I truly hope our little mermaid birthday girl enjoys hers!
So I wasn't planning to blog this outfit, whipped up the night before R's friend's party for which mermaid attire was required. But when she tried it on (ten minutes before the party was due to start, with me holding the safety pins in preparation) it not only fitted her perfectly, but she looked so gorgeous I pulled out the camera and started snapping away.
The outfit is self-drafted, if cutting and sewing by eye can even be called drafting. The skirt is just a stretchy tube with some ruffles at the end, and the top is bandeau-style (another tube, really) with halter-neck straps. The fabric was Spotlight's cheapest sparkly stuff and has a kind of psychedelic blotchy yellow-and-green effect going on, but it's perfect for mermaid clothing. I used stretch stitch throughout, but the fabric is actually not all that stretchy so getting into the car was a bit of an ordeal for poor R. Fortunately the skirt/tail can be hiked up and worn as a short, pouffy skirt (which looked really cool - wish I'd taken a photo of it) so as to be able to play party games, dance and outrun other children during the treasure hunt.
For the birthday girl I made a 'make your own cubby house' kit similar to the one I made for my nephew last year. My own kids adore building cubbies but are constantly frustrated by the difficulties of getting sheets and blankets to attach securely to chairs. The kit solves this problem with a bunch of clamps (SO much better than clothes pegs), some rope, and loops and ties on each corner of the sheets (I use strips of jersey and add loops/ties at the centre of each long edge too). A few glow sticks add mood lighting to the cubby house, or you can throw in a torch like I did last time. I packaged the whole lot up in a tote bag made from Ikea fabric - I love this fabric, and am really pleased I have some left so I can sew myself a bag too! Check out this tutorial for more details of cubby house (or 'fort') kits.
I suppose I should make my kids their own kit now, but last time they built a cubby - just a few days ago - a cat pooed in it. Nice. So I'm not that into cubbies at the moment, but I truly hope our little mermaid birthday girl enjoys hers!
Tuesday, 13 January 2015
Pineapple dress
Pineapples are all the rage, so a friend told me recently. All I know is that this cotton knit fabric called out to me from the racks of Darn Cheap Fabrics, and since I didn't think I could get away with wearing so much tropical fruit, I made a dress for R.
The pattern is dress M-2 from the Japanese Sewing Lesson Book and while I loved the look of it on the model in the book, it came out a little baggy on R - this despite my having used my usual trick of making the width a size smaller AND taking a couple of centimetres off at the centre folds of front and back. Never mind, it still looks pretty good and it's bound to be very comfy to wear.
This pattern is a simple one: just front, back, sleeves and pockets, but the little details of the angled pocket tops (see photo above right) and the cute bow closure at the back (almost too cute, but I knew R would love it) make it special.
Anyway, who doesn't love pineapples?
This pattern is a simple one: just front, back, sleeves and pockets, but the little details of the angled pocket tops (see photo above right) and the cute bow closure at the back (almost too cute, but I knew R would love it) make it special.
Anyway, who doesn't love pineapples?
Monday, 5 January 2015
Cushions and a kitten
For nearly a year now a selection of Japanese fabrics from Spotlight has been languishing in my fabric cupboard waiting to be made into cushion covers. And at last - in the absence of any other sewing projects - I got around to making them. They may not be the most exciting thing to make, but they certainly
provide great aesthetic return for a very small amount of effort!
The big cushions are simple 50 x 50cm squares with a zipper at one side. I used these cushion inserts from Ikea and cut the fabric the exact dimensions of the insert because I find that not adding any seam allowance makes the covers fit more snugly. I like to use this method for inserting cushion zips, setting the zips in 5cm or so at each end for neater corners.
For the one smaller cushion I had run out of the beautiful tree fabric and used some thick linen for the back. It looks so good, I really wish I'd done the same for all of them! Oh well, next time...
This is how the cushions look on our couch. But hang on - who is that sleek black creature with the white whiskers? Allow me to introduce our new kitten, Moriarty. We have all fallen completely in love with him and I could probably write a very long blog post about his beauty, his outrageously playful and daring antics, his cuddliness and his ability to locate cosy and cute places to sleep - but I'll spare you. I will say, though, that it's nice to have someone around who truly appreciates R's wardrobe!
The big cushions are simple 50 x 50cm squares with a zipper at one side. I used these cushion inserts from Ikea and cut the fabric the exact dimensions of the insert because I find that not adding any seam allowance makes the covers fit more snugly. I like to use this method for inserting cushion zips, setting the zips in 5cm or so at each end for neater corners.
For the one smaller cushion I had run out of the beautiful tree fabric and used some thick linen for the back. It looks so good, I really wish I'd done the same for all of them! Oh well, next time...
This is how the cushions look on our couch. But hang on - who is that sleek black creature with the white whiskers? Allow me to introduce our new kitten, Moriarty. We have all fallen completely in love with him and I could probably write a very long blog post about his beauty, his outrageously playful and daring antics, his cuddliness and his ability to locate cosy and cute places to sleep - but I'll spare you. I will say, though, that it's nice to have someone around who truly appreciates R's wardrobe! Thursday, 1 January 2015
Spotty New Year
I bought the white spotty material at Joelle's Fabric Clearance Warehouse, which I discovered when searching for swimsuit fabric on Ebay. I noticed their physical location was quite close to where I live, so one day I set out on a swimsuit-fabric-buying mission and was not disappointed - this place has loads of the stuff and it's quite inexpensive. The spotty fabric was a huge piece of remnant that cost me only $5, and I also got some UV-rated chloroban fabric in pink stripes to make a two-piece out of.
R wore her new bathers to the local pool the other day and looked so cute in them. As I've said before, I really recommend this pattern for anyone wanting to give bathers a go. I also heartily recommend the use of ice creams as a modelling prop (a.k.a. bribe) - this was far and away the most pleasant photoshoot I've ever done!
Happy 2015, everyone!
Subscribe to:
Posts (Atom)