Showing posts with label costume. Show all posts

Saturday, 22 October 2016

Japanese Day

R asked me to make her a special outfit for Japanese Day at school: a yukata (summer kimono). How tough could it be, I thought, as I ordered a cute-looking pattern from Amazon Japan. Sure, I had no idea what a yukata looked like close-up, nor how they were traditionally constructed, but given my years of sewing from Japanese patterns I didn't think it would be much of a challenge.

The pattern arrived and I realised that a yukata is made from mega-long pattern pieces that form both front and back sections - there are no shoulder seams. This requires a good few metres of fabric, which immediately ruled out just about all the fabrics I liked due to budget constraints (because how much is it really reasonable to spend on a school fancy dress outfit?). Eventually I found some Japanese-themed voile on sale at Spotlight that worked quite nicely.

The Japanese teacher at my work lent me a yukata so I could see how it was made. This helped me make sense of the bizarro pattern pieces, although being an adult's yukata it was different from the one in my pattern, which had the tucks at the shoulders and waist which - I have since figured out - are there to allow the garment to be let out as the child grows.

So I sewed the yukata, which, once I'd got my head around it, was quite simple (this series of posts on sewing a child's yukata was helpful). I even changed things up a little and used French seams so it would look neater from the inside. Then came the obi. I found some dimensions from a shop selling them on Rakuten, and, using some soft voile from my stash, sewed a giant sash (basically a massive long rectangle). Things were so rushed in the lead-up to the 'big day' that I didn't have time to try the outfit on R in advance, but in the morning I used this tutorial to help me tie the obi.

I spent an embarrassing amount of time admiring kanzashi hair ornaments on the internet and ambitiously had a go at making my own, but after two ribbon flowers I'd had enough. Cutting and gluing tiny bits of ribbon is really not my forte, but luckily the two I managed to make before giving up looked quite nice when attached to a two-dollar shop headband, and R was thrilled with her new accessory.


At school I watched R walk around, smiling sweetly as people admired her outfit. She continued to be a sweet little Japanese girl even after she came home that day, and I thoroughly enjoyed watching her bow to me and pretend to be polite! Given the generous tucks in R's yukata (meaning that it is likely to fit her forever) I'm not expecting to have to make another, but since I've got a grip on the general construction principles I think I'll have a go at a jinbei, which has a very similar top section. I just have to find the right fabric and finish a few WIPs first...

Sunday, 3 July 2016

The Arrietty dress

I love it when R makes dressmaking requests, and since seeing the beautiful Studio Ghibli film Arrietty she's been asking for a particular dress from the movie - a red one, with a high neck and long sleeves, that the tiny Arrietty wears to go 'borrowing'.

When R started asking for the dress it was nearly summer, so I told her she'd have to wait until winter. I thought she would probably forget about it, but no, the desire for the dress stayed with her and the requests became demands. Then I came across some thick, red wool jersey at Kim Anh Fabrics and knew this dress had to be made. There remained only the issue of how to draft it, and after much indecision I used the Oliver + S school bus T-shirt as the basis for the top part, shortening it considerably and adding a high neckband (much as Shelley did here - thanks for the inspiration!), then using Dana's First Day Dress for the skirt. All surprisingly easy and pleasant to sew, although it took a few fittings to get it just right.

I sewed a little square of 'apple' jersey to the inside back neckline so R will know which way to put it on, since the front and back of the dress are just about identical except for the seam on the neckband. The dress is such a great fit on R, and has a beautiful twirl to the skirt (not that I could persuade her to demonstrate this for my photos - it was a cold and windy afternoon and our photoshoot had to be extra quick).


In the movie Arrietty goes 'borrowing' with her father, carrying a cross-body bag with a huge button. Just for fun I decided to have a go at the bag. Copying a cartoon character's dress and accessories can be a complicated process. Before you even draft the things you have to figure out what they actually look like, and how that might translate into real materials and designs. I thought I could improve on the bag a bit, making it a less sack-like and more practical, so I drafted a curved messenger-style bag, added some pockets to the lining and put a little stamped cat tag inside (R's favourite bit!). The tape I'd bought for the handle was too narrow so I improvised some 'adapters' to join the handles more neatly to the body of the bag. These echo the design of the bag in the film, conveniently enough! Despite the fact that I had no idea what I was doing, the bag worked out beautifully - in fact, I kind of want one for myself now.

In the movie, Arrietty is a tiny person who lives with her family beneath a house, surviving by secretly 'borrowing' items from the people upstairs. I  promised R that I would photoshop some pictures to make her small, so I enlisted the help of some local wildlife:


I made Arrietty's giant pin (which sadly got cropped out of the cat and cockatoo photos above due to my limited photoshop skills) from a knitting needle and a polystyrene craft ball, just so R would have something to swish around while I took the photographs. I was tempted to keep going and make Arruietty's other accessories too, but they can wait until Halloween (if that's what R chooses to dress up as. She dressed as Studio Ghibli's Kiki one year and that was super cute). Anyway, both the dress and the bag are practical and and R loves both of them. Besides, it is DEFINITELY the weather for high necks and long sleeves!


Friday, 31 July 2015

Back in time


"I'm going back in time!" R announced a couple of weeks ago.

I assumed she was referring to some imaginative game related to her Little House on the Prairie obsession, but then she pulled a notice from her school bag about an excursion to an 'olden days school'. I felt a bit jealous, because if there's one thing I love, it's olden days stuff. Among my favourite books as a girl were - in addition to the Little House series - What Katy Did, Little Women, Anne of Green Gables and, as a token Ausssie contribution, Playing Beatie Bow. I dreamt of a time when girls wore pinafores, wrote on slates and played with rag dolls.

Having this golden opportunity to live my olden days fantasies through R, I did a bit of research to see what Australian schoolchildren wore in the early 1900s. Then, looking through R's wardrobe, I noticed something curious: she already has a heap of old-fashioned clothes, thanks to my beloved Japanese pattern books. All that was missing was a nice white pinafore, and I had the perfect pattern for it: dress A from Happy Homemade. I used some beautiful white fabric with a seersuckerish stripe and lined it with the lightest, softest lawn. I made two small modifications: I cut the shoulder ruffles a little wider for a more 'olden days' effect and - keeping the bodice the same size - I made the dress a couple of inches wider at back and front.


With her new pinny worn over her Japanese ensemble and a couple of giant hair ribbons, I reckon she really looked the part.


I'm pleased to say that R's dress came back from the excursion as snowy-white as it was in the morning, that she passed her fingernail inspection and completed her schoolwork satisfactorily (on her slate, naturally). Now to work on developing some lovely old-fashioned manners...

Friday, 23 January 2015

A mermaid costume and a homemade gift

I love sewing and have certain standards for the things I make. I'll unpick and re-sew (often several times) until I get things perfect, and visit shop after shop to find the exact right cord or ribbon. When it comes to kids' costumes, however, the opposite is true. Almost every costume I've ever made has been a slapdash, lazy effort replete with dodgy gathering, shonky hemlines and a few safety pins making up for less-than-perfect fitting. Because the costumes may only be worn once, and because I'm just not that into making them, there's only so much time and effort I'm prepared to put in.

So I wasn't planning to blog this outfit, whipped up the night before R's friend's party for which mermaid attire was required. But when she tried it on (ten minutes before the party was due to start, with me holding the safety pins in preparation) it not only fitted her perfectly, but she looked so gorgeous I pulled out the camera and started snapping away.

The outfit is self-drafted, if cutting and sewing by eye can even be called drafting. The skirt is just a stretchy tube with some ruffles at the end, and the top is bandeau-style (another tube, really) with halter-neck straps. The fabric was Spotlight's cheapest sparkly stuff and has a kind of psychedelic blotchy yellow-and-green effect going on, but it's perfect for mermaid clothing. I used stretch stitch throughout, but the fabric is actually not all that stretchy so getting into the car was a bit of an ordeal for poor R. Fortunately the skirt/tail can be hiked up and worn as a short, pouffy skirt (which looked really cool - wish I'd taken a photo of it) so as to be able to play party games, dance and outrun other children during the treasure hunt.

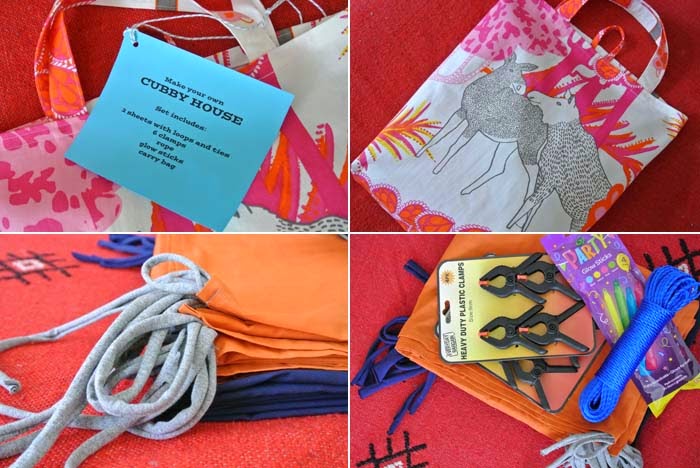
For the birthday girl I made a 'make your own cubby house' kit similar to the one I made for my nephew last year. My own kids adore building cubbies but are constantly frustrated by the difficulties of getting sheets and blankets to attach securely to chairs. The kit solves this problem with a bunch of clamps (SO much better than clothes pegs), some rope, and loops and ties on each corner of the sheets (I use strips of jersey and add loops/ties at the centre of each long edge too). A few glow sticks add mood lighting to the cubby house, or you can throw in a torch like I did last time.  I packaged the whole lot  up in a tote bag made from Ikea fabric - I love this fabric, and am really pleased I have some left so I can sew myself a bag too! Check out this tutorial for more details of cubby house (or 'fort') kits.

I suppose I should make my kids their own kit now, but last time they built a cubby - just a few days ago - a cat pooed in it. Nice. So I'm not that into cubbies at the moment, but I truly hope our little mermaid birthday girl enjoys hers!

Sunday, 24 August 2014

Couturier to the Queen

Bet you can't guess who R dressed up as for her friend's Frozen-themed birthday party. Was it the snowman? The reindeer? The dastardly Prince Hans, perhaps?


According to shop assistants at the places where I bought the fabrics for this dress, mums all over Melbourne are busy sewing up Elsa dresses for their daughters - which would explain why Spotlight has such a large range of glittery snowflake fabric. 


This little number was a pleasure to sew and (for R) a pleasure to wear. The pattern is self-drafted, with the top part based on one of R's long-sleeved school tops and the bottom section improvised. I made the upper section of the bodice white in an attempt to at least vaguely resemble the gown in the movie (it actually has sheer sleeves, but no way was I going to attempt sewing with that stuff!) and I found joining the white and blue parts easier than I'd anticipated, although they puckered a little when topstitched. The blue fabric is totally synthetic and totally stretchy, so it's already become a little longer in the torso than intended, but it has a lovely soft reverse side, making the dress extra comfy. The white is some kind of stretchy polyester knit.


To ensure washability the cape is completely separate from the dress, and attaches via two little buttons just under the arms. It was supposed to be floor length but R insisted that I leave it ridiculously long. Consequently she spent much of her time at the party today holding up her cape (including at least an hour's jumping on a trampoline) but this didn't bother her in the least. The things we do for fashion!


I'm thinking R may want to wear this for Halloween this year. I wonder if her older brother will agree to be a snowman, or a reindeer...? Now that would be convenient!

Saturday, 28 June 2014

Happy Homemade pirate top


Pattern N from Happy Homemade vol. 2: a smock-style top in linen, size 110 with size 120 length as usual. 
 

I made this for R to wear as a 'pirate shirt' to a friend's dress-up birthday party, but since it's such a lovely pattern I hoped that she would wear it again on non-piratical occasions. Unfortunately, when she took the top off this evening she announced that it should go in the dress-up box.

Me: 'But it's a lovely top! You can wear it other times, too - not just for dress-ups.'
R: 'It's a pirate top.'
Me: 'No it's not, it's a real top that you can wear!'
R: 'It goes IN THE DRESS-UP BOX.'

So I don't know if I'll have any luck getting her to wear it again. Which is sad, because it's a beautiful style. I love the sleeve frills and the little lace tab under the placket. I totally stuffed up one button-hole (and tried to unpick and re-sew it, thus making it even worse) but luckily it's barely noticeable. And I must say, this top looks terrific both with and without pirate sash and sword - so versatile!


For the record, although R chose pirate over mermaid (the invitation having given those two options) she refused to wear pants - it was skirt or nothing. She might be a stubborn little pirate but she knows what she likes!

Tuesday, 6 May 2014

Toga party


It might seem like I only ever make clothes for my daughter, but look! Here's a lovely garment I whipped up for my son - just perfect for school, sports, parties, or any occasion you could name.

If you know your ancient Greek mythology you might recognise Hades, King of the Underworld. And if you really know your ancient Greek stuff, you might wonder about the authenticity of Hades' toga, not to mention the curtain-tie-belt, Crocs sandals and glittery crown... but for the purposes of the Grade 4 Mythology Day, the outfit was more than adequate.

Unfortunately Hades lasted only a couple of hours at school before developing a temperature (which I guess can happen when you wear a toga on a cold autumn day) and being taken home, via the school sick bay. Good thing I got my photos before school, hey?

Friday, 1 November 2013

Our Halloween


Halloween preparations were a little last-minute this year, but I managed to outfit K and R as per their request: Kiki the witch-in-training (from the movie Kiki's Delivery Service) and her sarcastic cat Jiji. For R's dress I used the smock pattern (e) from Happy Homemade vol. 2, moving the elastic casing to the very end of the sleeves to make them look more like the dress in the movie. I also made a big red bow on a headband and bought a witchy-looking broom from an Asian grocery shop to complete the costume. She looked so sweet! I quite like the look of the smock on her, and am thinking I might sew up another one sometime in something less stiff and black.

For K I just put some fleece cat ears on a black headband, made a long black tail out of fleece and cut down a pair of women's black tracksuit pants. With a black top and some painted-on whiskers he looked very cat-like - apart from being 140cm tall and walking upright, of course. It helps that he has a good head of fur...

In the days leading up to Halloween R was in a state of great excitement. With a bit of help, she made some spooky Halloween lanterns (black paper wrapped around jars with candles inside) and did a heap of ghost/monster drawings which she delivered - anonymously - to every house in the street. And on the night, her efforts - and those of all the other children who joined us to trick-or-treat - were richly rewarded. VERY richly rewarded.


Oh, and I finally found an excellent use for the single pumpkin that grew on our vine last summer...

Hope everyone enjoyed a happy Halloween!


Wednesday, 31 October 2012

Halloween

Return of the mummy... plus a princess

I have always enjoyed fancy dress. Perhaps this is what inspired me to go trick-or-treating as a young child, despite the fact that Halloween wasn't widely celebrated at the time (which meant that almost no one whose door we knocked on had any sweets to give us). My friend and her little brother would join me and my little sister, all of us wearing costumes put together from whatever was in the dress-up box, and we would wander off down the street after dark with (to the best of my memory) no parental supervision whatsoever. Afterwards we would return home and inspect our loot, which was usually comprised of a few sweets, some coins, biscuits and an assortment of non-edibles (I distinctly remember being given candles, stickers and once, by the family of a boy from our school, some Japanese salty plums in lolly-like wrappers. Our classmate stood in the doorway giggling as we left, presumably anticipating the nasty surprise we would receive when we tasted them).

Decades later, Halloween has become more popular here and many children go trick-or-treating in their neighbourhoods. It's hard to resist a pagan festival combining dress-ups and sweets... so I did a letterbox drop in our street asking children to join us for some trick or treating, and for parents to tie balloons on their letterboxes if they would like us to knock on their door (R got to be 'postie' and thoroughly enjoyed it. Since that day, letter posting games have been very popular around here).

Today was the big day and although I had spoken to a few neighbours whose kids were planning to dress up, I was worried we might end up with only a couple of homes to visit. So it was wonderfully exciting, come evening, to see balloons on several houses up the street. And there was a real buzz in the air when the children gathered outside our house dressed as witches, fairies and superheroes, lolly bags at the ready. I kicked off proceedings by handing out chocolate frogs and silly bandz, then we made our way up the street as a group. At every house we went to I was amazed to see how thoughtful people had been, preparing little bags and packets of sweets, or offering bowls and jars of mixed lollies for children to choose from. We all met neighbours we had never spoken to or seen before. It was really lovely.

And although I'd worried that our street of 20 houses (half of which participated) was a little small for trick-or-treating, I'm so glad it isn't bigger because K somehow managed to wind up with the most ridiculously large collection of sweets...


And R was very happy with her (much more modest) haul too.

R looking dazed as the evening comes to an end

 After a sweet-eating session it was bedtime for the mummy and the princess. But the little lantern I made (just a bit of black paper around a jar with a candle in it) was apparently so terrifying to R that I not only had to remove it from the hallway but was also made to promise that I would blow out the candle, scrunch up the paper and dispose of it.


Never mind - I'll make another one next year. Sweet sugar-fuelled dreams, kids!

Sunday, 30 September 2012

Mummy's boy


K was invited to a birthday party for which the dress code was 'ghoulish'. He immediately announced his intention to wrap himself in toilet paper and be a mummy, but I could see that wasn't going to work out too well.

I had a look at this tutorial for a mummy costume and concluded it wouldn't be too much effort. After all, I already had an old white sheet put aside for costuming purposes, and how hard could it be to find a white top and pants at the op shop and sew some fabric strips onto them? As it turned out, it was a fair bit more effort than I had intended, and I couldn't find any light-coloured pants so I ended up having to make them myself out of calico, using some pyjama pants as a pattern.

Tearing the sheet into strips was the best bit. The kids loved ripping it up, and even played for a while with the strips of fabric, which R said were her 'dogs' (sadly their playing soon degenerated into a bickering match over who had more dogs and whose dogs were better). As instructed in the tutorial we soaked the strips in some (very diluted) tea for a bit to make them look more authentically mummyish (to use the term preferred by professional Egyptologists).

Sewing the strips onto the top was a highly repetitive experience that I hope never to have to do again, but I did enjoy the freedom of sewing as messily as possible, not having to finish any raw edges and leaving threads dangling without clipping them off. The sleeves of the top turned out to be rather tight on K (he totally freaked out when he got straitjacketed trying to get his arms into the top) so I cut through the seams at the underarms on both sides and left them open. The pants were easier - I made them in two pieces, then sewed the strips on before sewing the two pieces together. I didn't even bother sewing the strips on properly because the fabric underneath looked mummyish enough that it didn't matter if it showed through.

Lastly I roughly sewed a couple of strips in kind of a spiral to make a little cap, which sat on K's head with one long strip joined to it which I wrapped around his head and face and secured with a safety pin. A bit of white facepaint... and he was good to go.

He looked FANTASTIC, if I do say so myself! A whole lot of school mums are probably wondering why I bothered... but it was a very satisfying project. And of course he could wear it for Halloween, although I have a long-cherished wish to dress my children as Pebbles and Bam-Bam and with Kids' Clothes Week coming up, they may soon find themselves going door-to-door in cute little stoneage outfits... or is that cruel of me?