I love sewing and have certain standards for the things I make. I'll unpick and re-sew (often several times) until I get things perfect, and visit shop after shop to find the exact right cord or ribbon. When it comes to kids' costumes, however, the opposite is true. Almost every costume I've ever made has been a slapdash, lazy effort replete with dodgy gathering, shonky hemlines and a few safety pins making up for less-than-perfect fitting. Because the costumes may only be worn once, and because I'm just not that into making them, there's only so much time and effort I'm prepared to put in.
So I wasn't planning to blog this outfit, whipped up the night before R's friend's party for which mermaid attire was required. But when she tried it on (ten minutes before the party was due to start, with me holding the safety pins in preparation) it not only fitted her perfectly, but she looked so gorgeous I pulled out the camera and started snapping away.
The outfit is self-drafted, if cutting and sewing by eye can even be called drafting. The skirt is just a stretchy tube with some ruffles at the end, and the top is bandeau-style (another tube, really) with halter-neck straps. The fabric was Spotlight's cheapest sparkly stuff and has a kind of psychedelic blotchy yellow-and-green effect going on, but it's perfect for mermaid clothing. I used stretch stitch throughout, but the fabric is actually not all that stretchy so getting into the car was a bit of an ordeal for poor R. Fortunately the skirt/tail can be hiked up and worn as a short, pouffy skirt (which looked really cool - wish I'd taken a photo of it) so as to be able to play party games, dance and outrun other children during the treasure hunt.
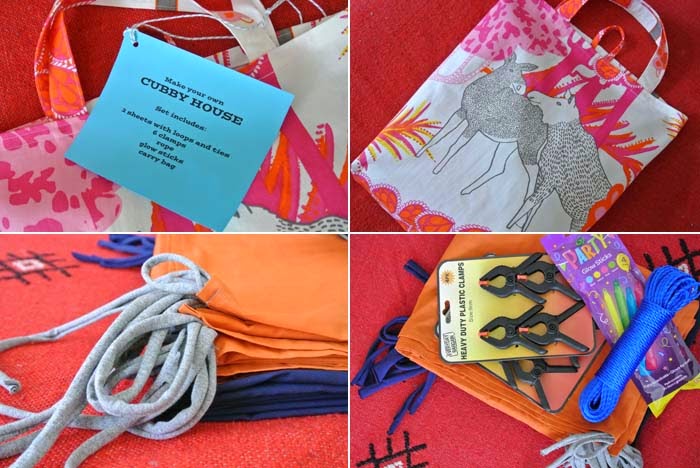
For the birthday girl I made a 'make your own cubby house' kit similar to
the one I made for my nephew last year. My own kids adore building cubbies but are constantly frustrated by the difficulties of getting sheets and blankets to attach securely to chairs. The kit solves this problem with a bunch of clamps (SO much better than clothes pegs), some rope, and loops and ties on each corner of the sheets (I use strips of jersey and add loops/ties at the centre of each long edge too). A few glow sticks add mood lighting to the cubby house, or you can throw in a torch like I did last time. I packaged the whole lot up in a tote bag made from Ikea fabric - I love this fabric, and am really pleased I have some left so I can sew myself a bag too! Check out
this tutorial for more details of cubby house (or 'fort') kits.
I suppose I should make my kids their own kit now, but last time they built a cubby - just a few days ago - a cat pooed in it. Nice. So I'm not that into cubbies at the moment, but I truly hope our little mermaid birthday girl enjoys hers!


That mermaid costume looks superb! I don't dare let my daughter see it!
ReplyDeleteCool cubby idea, Those plastic clamps would be a huge hit at our house.
It's funny, I would have killed for this costume when I was a kid, but R didn't seem especially thrilled by it. As for the plastic clamps, I just went out and got some for K and R so even if I never get round to making some cubbyhouse sheets, they can at least stop crying over ineffective clothes pegs. If you want some, go to a $2 shop - they're too expensive at hardware stores.
DeleteI was laughing reading about trying the mermaid costume on 10 minutes before the party with a bunch of pins ready to be used hahaha The final result is stunning! I hope the party went well. I trust the birthday girl enjoyed the pressie! Clamps! Ha! They definitely work better than clothes pegs!
ReplyDeleteThanks Jenya! R had loads of fun at the party - fortunately the kids changed into their 'dance clothes' halfway through, so she didn't have to take tiny mermaid steps for the whole time :)
ReplyDelete