Wednesday 23 January 2013

Spotty geranium dress for R


My second geranium dress, this time with flutter sleeves and notched neckline (I found this easier than the cutout version - perhaps because I've made so many ice-cream dresses, which have the same feature - such as this one). The fabric is cotton from Spotlight. I added patch pockets on R's request; she loves to collect and carry little treasures.


Although R is only a few months off turning 5, I made a size 3 and lengthened the skirt by 2.5cm. Her chest and waist are very small and I didn't want the bodice to swim on her. As it is, the size 3 is a lovely loose fit with room to grow, so she can wear it next summer too. The one thing I did differently from the first geranium dress I made was to hand-stitch the lining to the skirt, because my 'stitching in the ditch' on the last one was not great. Doing it by hand, while laborious, does give a cleaner look to the dress.


The proportions of the dress are lovely and I'm very happy with the way it looks. If her wardrobe weren't already crammed with cute things to wear I'd be making another right away, but I think I'd better hold off for now. Unless, of course, I were to make an autumn/winter version, perhaps in finewale corduroy... now that would be nice.


It's a lovely, comfy dress that I'm sure will become a favourite.


Monday 21 January 2013

Flower factory


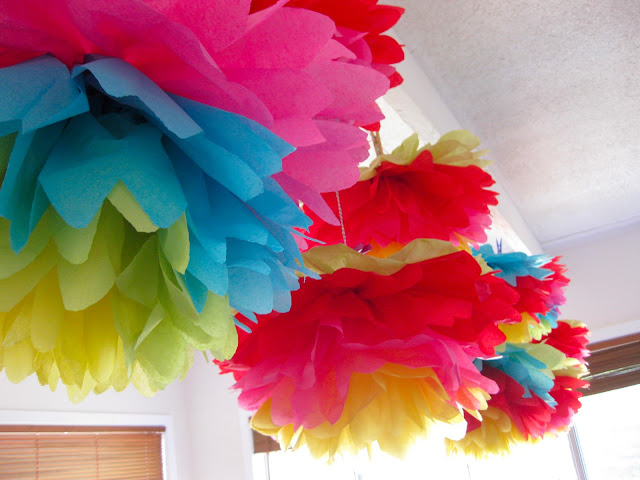
My aunt asked if I could make Mexican tissue paper flowers for her granddaughter's first birthday party. I made the first flower and loved it so much that I thought I'd be happy to keep making them for the rest of my life. True, the elation might wear off after the first hundred or so, but having made over 30 in the past few days (one broken pair of scissors; one very calloused finger) I can tell you that I still adore making them. So if teaching doesn't work out, I might just go over to Mexico and set up shop on a beach somewhere.

I took this tutorial as my starting point and made three sizes of flower: giant hanging ones (using whole sheets of tissue paper), medium ones to be arranged on tables (from half sheets of tissue) and small ones (quarter sheets) which my aunt is planning to put onto wire 'stems'.

The technique is basically to layer the tissue paper, fold it concertina-style (my folds were about 1.5 inches), cut notches out of the middle where the tie or pipecleaner will go, and cut each end of the folded papers into a rounded petal shape. For each flower I used seven layers of tissue, regardless of size.


The only hard part was working out how to store the flowers safely until delivery time. I ended up hanging the giant ones from a string across the loungeroom; the smaller ones were light enough to keep in baskets. Our house looked very festive this week, which is pretty much how I'd like it to look all the time. Happily, my husband liked the flowers so much he's asked me to make some giant hanging ones for our home, so my floral fantasies are running wild because there's not a room in the house that wouldn't benefit from a splash of colour - even the car looked amazing once it was loaded up with them:


I couldn't resist decorating the children too...


...and they loved it!

Thursday 17 January 2013

A reversible summer hat for R


This reversible hat languished in an 'unfinished things' pile on my sewing table until today, when I fished it out, hammered in a couple of eyelets and turned it into a reversible hat with reversible straps.


The pattern is the Oliver + S reversible bucket hat (free download here) but as described in a previous post I widened the brim, because although the original design is cute, it's not much use for sun protection. I love the widened interfaced brim - it gives excellent coverage and can be folded up at the front if less sun protection is required.


To keep the hat on R's head (because it always seems to be windy round here) I made bias tape from the green material which I used for the 'inside' of the hat and sewed a little rectangle of velcro at the ends. I put little white eyelets in each side of the hat and threaded the strap through so that it forms a half-band around the back of the hat before becoming straps underneath . Technically, you could now reverse the hat and still have straps - all that's required is to unthread the strap and rethread it through the eyelets. However, the eyelets don't look so great from the other side. I tried to find eyelets (or grommets) that looked good from both sides, but it seems that no such thing is available (if any readers know otherwise, please tell me!). The unsatisfactory hardware options were what made me abandon the hat in the unfinished pile, where it languished for a couple of months until today's hot weather made me decide to settle for the not-quite-good-enough eyelets so R could finally wear the thing.


So now we have a very sun-smart and almost completely reversible hat, perfect for pottering around the garden on a 40-degree day.

Monday 14 January 2013

Cardboard distractions


I'm not short of work-in-progress - anyone passing my sewing table could attest to that. But despite the many things I should be finishing (some of which are so close to completion it's ridiculous) it's amazing how appealing and distracting a completely new project can be. Which is why I spent yesterday evening cutting up boxes to make little pencil cases and wallets. The kids were thrilled to see their favourite cereal (Fruity Bites) and the icy summer favourite Sunnyboy featured on the wallets and pencil case.

These recycled beauties are quick to make and don't require much in the way of materials, especially if you, like me, keep carefully flattened cereal boxes to use for unspecified future projects. Add a ruler, gluestick, stanley knife, pen, elastic and some kind of poker or punch and you're all set.


I used this tutorial for the wallets and this one for the pencil case (which I made shorter so I could use the Sunnyboy box). Both tutorials have templates that you can download and use. Quick, cute and recycled - what more could you ask for?

Saturday 12 January 2013

Geranium dress for baby M


Isn't serendipity a wonderful thing? Like when you go to the swimming pool on a 40 degree day and enter the car park just as someone is reversing out of one of the coveted shady parking spots. Or when you walk into Spotlight and immediately see some fabric you adore, then discover it's on clearance at a ridiculously cheap price. Or when your baby has just tumbled out of his highchair and gone clunk on the floor and a knock at the door turns out to be your stepfather the doctor*.

Serendipitously, Rae's geranium dress was released just as I began the search for a simple pattern with a loosely-fitted bodice, flutter sleeves and a gathered skirt (I had considered improvising one using the Oliver + S bubble dress pattern as a starting point, but thought I would probably stuff up the bodice in attempting to get rid of the curved-out shoulder bits). Rae's pattern offers three styles of bodice, the option of flutter sleeves, two styles of skirt - pleated or gathered - and two styles of notched/cutout neckline. I was vacillating over whether to buy the pattern (as opposed to wasting several evenings trying to draft one, then throwing away a metre of good fabric in an attempt to sew up a fatally flawed garment) when I realised that - serendipitously! - my niece was about to turn 1, thus providing the excuse I needed.

So here's my first geranium dress, in size 12-18 months with faux cap sleeves and cutout on the neckline. My attempts to make the cutout more U-shaped failed, but the dress was otherwise very pleasant and easy to put together, and had I not made a few spectacularly stupid mistakes along the way (for example, ironing interfacing to the wrong side of the fabric and not noticing until the bodice was sewn up) it would have been fairly quick, too. 


It was hard to get a photo of M in her dress but this is the best I could do - with a t-shirt underneath and her mum holding her up while she appears to be trying to pull it off (or perhaps she's just feeling the fabric and saying 'I love this voile! Did you get it on clearance at Spotlight, by any chance?'). The size is very roomy on her, but I'm happy with that - nothing worse than a handmade garment that only fits for five minutes. Happy birthday, beautiful baby!

Coming up next (or at least, soonish): R's geranium dress, with flutter sleeves.

*He survived the fall without any apparent ill-effect, but he does have a silly streak a mile long and is prone to putting on ridiculous and highly irritating voices. Or perhaps he just gets that from his dad...

Saturday 5 January 2013

The great A-line skirt experiment

 
I don't often buy patterns for children's clothing, and especially not for skirts. There are so many great tutorials online that whenever I want to sew something I just search for one. But when it came to making an A-line skirt for R, I couldn't find anything appropriate, so I decided to experiment with making my own pattern. After all, how hard could it be?


As it turns out, not hard at all. And now I have a one-piece pattern (from which I cut my two pieces, then add a rectangular piece for a waistband) that I will be using again and again. I like ruffles and frills, but gee it's nice to make something that has no gathering! No zip! No buttons! No elastic! It hardly uses any fabric and is super-quick to sew - just two pieces sewn together to form a skirt with the waist large enough for the wearer to step into; then a rectangle of stretchy cotton jersey measured to fit around the waist, stretched out and sewn onto the skirt, then folded over and stitched down to form a soft and comfy waistband.


For the second skirt I made the waistband a tiny bit too large so I put some elastic in, which I'll remove when R's waist is bigger (if it ever gets any bigger. She seems to grow up, but never out. Her skirts fit for years!). 


I would love to make a few more of these, but I think R's wardrobe has reached skirt saturation point. So for now I'll just hang on to my homemade  pattern and enjoy seeing R in her two little A-lines. I think they look really cute on her.


Friday 4 January 2013

Things to do on a really hot day


We upped the excitement these school holidays by having a very special guest: my 15-year-old sister from South Africa. K loves playing games with her; R says she just likes to 'follow her around and see what she does'. It's not so easy to find activities that are appropriate and entertaining for ages 4-15, even more so when the weather is blisteringly hot. But since you can't play Mario Karts and watch movies all day (Superman was well received by all three viewers, although I'm pretty sure the youngest had no idea what was going on), here are some of the things we did in-between eating icy-poles:


Drawings in the style of Ed Emberley (we used Ed Emberley's Book of Faces). The two older ones copied them straight from the book; R asked me to draw circles, onto which she drew faces and bodies. We all had great fun doing these.


A waterfight using water pistols hastily purchased from a two dollar shop. Closely followed by...

A water balloon fight on the back deck, in which we parents scored quite a few hits. I was unable to photograph this, for obvious reasons. In fact, just stepping outside the back door was quite risky this afternoon. 

Eating all the sweets in the house - the leftovers from Halloween, Christmas and various party bags. They had been put away high up in a cupboard and I was sick of being asked when can we eat the sweets? So I told the kids they could eat as much as they liked after dinner, then throw out whatever was left over. Sticky, disgusting, ugh. But at least they're gone now - although I think K may still have a few stashed away somewhere, the sneaky little thing.

An evening walk around the neighbourhood at 8.30pm, when the temperature was a mere 38 degrees (down from 41 earlier in the day). The streets were so deserted, we pretended we were the only people alive on earth.


As I write this it's 10.41pm and it's still very hot - 36 degrees (that's just short of 97 degrees, for those of you who speak fahrenheit). My daughter, in her usual weird way, has insisted on taking a heat pack to bed. I have a fan on here in the kids' bedroom, but it's barely making a difference. In quarter of an hour there is a cool change coming, so hopefully we'll soon be flinging open the windows and doors. More hot days are forecast for next week, which means more icy poles, more water fights -  and Superman II.