Wednesday, 28 November 2012

Salad spinner painting


I had read about these paintings here, but had to wait til I found a salad spinner in an op shop before I could give it a try. Now I can't put the spinner away because R is totally addicted to painting with it! And I can completely understand why, because I've tried it myself and it really is fun. Have you noticed how children love randomness and surprise? This activity combines the pleasure of dropping or squirting paint onto a surface and the physicality of spinning the spinner with the excitement of an unpredictable (and very pretty) result. 

The process is incredibly simple, once you've laid your hands on a salad spinner. All you need are some paper plates that fit inside (I found the Black & Gold brand ones from IGA perfect for this, or you could cut down some larger ones), some paints (we used Radical Paints, which are easy to squirt or drip onto the plate) and - as recommended on Casa Maria's Creative Learning Zone - some hairgel. Yes, hairgel. Apparently it gives a nice sheen to the painting, and who am I to mess with her tried and true method? Anyway, R loves the smell. Once you have the equipment and supplies assembled, all you do is drop paint on the plate, put the lid on the spinner and turn it around.


For something that uses a lot of paint this is a surprisingly un-messy activity, provided you remember to put some newspaper under the spinner to soak up the paint that leaks out the bottom.


R likes to apply paint (and gel), spin, then examine the results and add more paint. She often repeats this process a few times before she declares the painting finished. We are going through the paint at a rate of knots, but then we have been doing this every day since I bought the spinner...

Here are some of the beautiful paintings by R (plus one by K):


I would love to do this with the kids at playgroup but we would need several spinners to avoid frustration. So for now it's just our at-home art activity - until I find another few spinners at the op shop!

Monday, 19 November 2012

DIY tulle-ish skirt


A pretty skirt at Cotton On caught my eye, but R already has so many skirts that I really couldn't justify buying it. Making my own version, however, seemed totally justifiable! So I had a good look at how the skirt was made, then went out and bought a bit of satin, some netting (the kind that looks like tulle but is soft and a little stretchy) and some wide sparkly elastic for the waistband. I added a flower detail at the waist, just like the skirt in the shop, but I made mine detachable (I don't think theirs was, but I prefer that kind of thing to be removable for washing purposes).

For anyone who's interested, it's a very simple design that I can take absolutely no credit for (but hey, they probably nicked it from some other designer anyway). Here's how I did it:

I used one of R's skirts to work out how long I wanted the skirt to be (in my case, 25cm) and figured the wide waistband would compensate for the need to add seam allowances. So I cut about 25cm of satin, using the entire width of the piece for the underskirt. I sewed the back seam together, creating a loop of fabric, zigzagged the top edge and hemmed the bottom edge. I did much the same for the tulle but cut it so it would end up a little longer than the satin underskirt, and also folded it to make a double layer. Obviously that part didn't need hemming or finishing (hooray). The tulle was wider than the satin so after I sewed the back seam I gathered it a bit to make it the same width, then sewed the tulle and satin together around the top edge with a basting stitch. Then it was a simple matter of sewing the ends of the elastic together to form a waistband loop, pinning the skirt to the inside of the elastic (right side of skirt to wrong side of elastic), stretching the elastic out and sewing. Then unpicking because I failed to catch portions of the skirt while sewing. Then resewing. And unpicking again. Tearing my hair out while cursing my own incompetence. But finally getting there.

I finished it off with a satin flower from this tutorial, using black beads for the centre of the flower. I glued the whole thing to a little badge so it would be removable. Ta da! I tried it on R only to see it fall down - the waistband was too big. Oh dear. Unpick. Resew. 

But it looks very sweet on her - and she even likes it.


Sunday, 18 November 2012

Portraits

I agonised over what to get my stepfather for his 70th birthday. He's a very unmaterialistic person who neither wants nor needs much, apart from his books, but we wanted to give him something special. My husband came up with the idea of commissioning a pair of portraits from two local artists (a.k.a. our children). So I put them to work with a photograph of the birthday boy in front of them and asked them to look at his face, then draw him in whatever way they chose.

R went for the full-length portrait, dressed him in blue and yellow striped pants and depicted him holding presents in each hand:


K worked more directly from the photograph, adding wrinkles and colouring the skin pink ('because that's the closest to skin colour we have' - clearly I need to buy these children some skin-toned markers!):


The frame I got for them had spaces for three photos so we added a central picture with '70' outlined in large letters. Each child filled in a letter with patterns and K wrote a birthday message at the bottom.


I was so pleased with the end product that I'm sure we'll be doing this again for some special person. Brace yourselves, family members - you too may soon be immortalised in a pair of portraits!

Monday, 12 November 2012

Playgroup art and craft: Painting with droppers


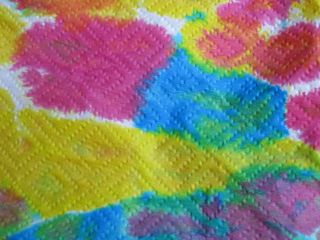
A set of droppers (or 'pipettes'), some liquid food colouring and a roll of paper towel were all we needed to set up today's colourful art activity.


I diluted the food colours, testing them to make sure they were still vivid enough, and put them in some little jars (I thought they would be less likely to be knocked over than the lighter plastic paint-pots - I was wrong! Fortunately we put down lots of newspaper on the table first - made cleaning up a whole lot easier). We gave each child a piece of paper towel and watched as they flooded them with colours. The food colouring looks very dark when wet, but when dry has a luminous quality much like watercolour.

A special thing about this activity is that it it involves learning to manipulate an instrument - the dropper - as well as observing the fascinating effects of putting liquid colour onto a highly absorbent surface. The colours bleed into each other, creating beautiful rainbow blobs, spots and blotches. It is just magical.

Here are the wonderful paintings the children at playgroup produced today:


And here are some details from the paintings:


Tuesday, 6 November 2012

Slowly sewing...


My sewing output has slowed to a trickle since the marathon effort of Kids' Clothes Week Challenge. I do have a couple of works-in-progress (pyjama pants for K; another bucket hat; the shamefully-still-unsewn back of R's grey linen dress; ) but I'm enjoying taking my time without any deadlines.

The early arrival of a friend's baby, however, forced me to get my act together and actually finish something: a pair of bibs. Now this may sound weird, but I really dislike the word 'bib'. I have no issue with bob... or bub... but there's something about 'bib' that I find unattractive. Worse still is the word 'bapron' (a contraction of 'baby apron'), which is the name that Jess from Craftiness is not Optional gave to the bib in her fantastic tutorial. A while back I made three of these for my niece - they were fun and simple to put together, and they look very sweet on. As the name suggests they are a cross between a bib and an apron, and the underarm ties help them stay on securely. I made mine with cotton poplin on the front and a cosy flannelette for the back.

It's possible that my dislike of the word bib dates back to a job I had in my early twenties, when I worked as a waitress (a very bad one) at a pasta restaurant (a very good one) that provided enormous paper bibs for its patrons. Seeing grown men wearing bibs was not a pretty sight, and tying the bibs on the men, a task I was expected to perform, felt wrong in so many ways. Needless to say, women never accepted the offer of a bib. I think they decided they would rather get pasta sauce on their tops than stoop to wearing one. Or perhaps they were just secure in the knowledge that they were tidier eaters.

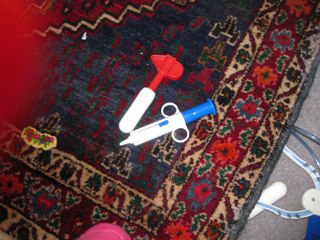
Fortunately R has always been a neat eater and a very proficient user of cutlery. And since I have now digressed completely from the topic of sewing, allow me to share a few photos that she took this evening. Sometimes it's interesting to see the world through the eyes of a four-year-old.

still life with tissue box

loungeroom floor. kind of disturbing, even if they are toys...

police van on night patrol


Monday, 5 November 2012

Playgroup art and craft: Shaving cream and paint


Shaving cream and paint, when combined, provide a wonderfully textural painting experience. The mix results in a thickened, fluffier paint that is fantastic for finger-painting.


Today at playgroup I sprayed some shaving cream into plastic containers, added a few blobs of paint into each and let the kids launch straight into things without stirring it first (because mixing it up is one of the most pleasurable parts of this activity!). The children needed no encouragement to get their hands dirty and start painting.


Because children love to apply fingerpaint very thickly, we used A3 sheets of light cardboard rather than paper, which would have fallen apart when we lifted it to hang it up to dry.


R tried drawing lines on the thickly applied paint, first with her finger, then with the handle of a paintbrush. This technique is called sgraffito - scratching away the surface to reveal the colour underneath (which in her case was a pink piece of card).


Afterwards she enjoyed menacing me with her 'monster hands' but I'm pleased to report that I (and my clothes) survived unscathed.